Close Klik 2x!
Showing posts with label Technology. Show all posts

Thursday, August 20, 2015

How to Fix And Use the Limited Connectivity of Wireless Internet


Howtojetro.blogspot.com | How to Fix And Use the Limited Connectivity of Wireless Internet - When you see limited connectivity as your Internet status, your internet is temporarily down. To fix this, you need to start at the modem, which is the first place you have access to your connection and then work forward to your computer to find the source of the problem. The cause of limited connectivity depends on many factors, but in most cases you can solve the problem without replacing the equipment or picking up the phone to call your Internet service provider (ISP.)

Instructions

1. Power cycle your modem by turning off your computer and all other computers in your wireless network. Unplug the modem and router. Wait about 60 seconds. Plug in the modem. Wait for the signal to lock. If it doesn't lock within 10 minutes, check the connection wires in the back for tightness. Tighten to the best of your ability. Firmly push the plug cord into the outlet and into the back of the modem. If the signal remains unconnected, give it another 15 minutes before calling your ISP to see if an outage exists in your area and to check the health of the modem. You may need to replace your modem.

2. Plug in the router, if the modem secures the signal. Wait for the connection to establish. If it connects, then move on to the computer. If it doesn't, connect an Ethernet cord to the modem and a computer. Turn on the computer and open a browser. Try another computer, if you can't surf the web. If the second computer connects, the first computer may need some work. Skip to Step 3. If you can access the Internet with the Ethernet cord, then the problem lies with the router. Turn off the computer, router, and modem again. Disconnect the Ethernet cord from the modem and computer. Turn on the modem, wait for the connection and plug in the router. If the connection still doesn't secure, then replace the router, unless you recently reset your router. If you recently configured your router, try resetting the DHCP settings. The router's instruction manual has the information to enable DHCP. After enabling, restart your computer.

3. Turn on the computer, if you haven't already. At this point, you should have a connection established on the router and modem or determined that one of them caused the limited connectivity. Click on the computer icon in the bottom right corner of your desktop. Choose "Manage Network Connection." Select the active connection and click "Diagnose this Connection." For XP models, click on "Start," "Control Panel," and "Network Connection." Click on the connection and choose "Repair." Sometimes, the result is positive and the connection repaired; other times, it may give a reason and solution or be unable to determine the cause.

4. Check the connection to make sure it is the connection you want. Your computer has access to several wireless connections.

5. Renew and release your IP address by clicking on "Start," "All Programs, "Accessories" and "Command Prompt." In Xp models or older, choose "Start" and "Run." Enter "cmd" and click "Ok." In the command prompt, type "ipconfig/release." Once it releases the IP address, type "ipconfig/renew" to renew the ip address.

Yeah, it's How to Fix And Use the Limited Connectivity of Wireless Internet. Keep trying! If you still feel confuse, you can see the video below.
Friday, August 7, 2015

How to Enable Hidden Dark Theme on Windows 10


Howtojetro.blogspot.com | How to Enable Hidden Dark Theme on Windows 10 - Windows 10’s new default theme is very bright, with lots of white, from window backgrounds to white title bars. Microsoft built a dark, black theme into Windows 10, but it’s hidden.

Microsoft has said it will continue working on Windows 10, so it’s possible this feature will be improved and there will be an easy toggle for it in the Settings app in the future. For now, here’s how you have to activate the dark theme.

Enable a System-wide Dark Theme

Microsoft may eventually add a toggle to the Settings app that switches between a system-wide light theme and dark theme. This is the way it works on Windows Phone. For now, you can still enable a system-wide dark theme, it just requires editing the registry. This will enable the dark theme for quite a few universal apps, but not all of them.

You can do this manually with the instructions below, or download our Enable Dark Theme on Windows 10 registry hack. Just double-click the included .reg file to enable the dark theme, and double-click the other included .reg file to re-enable the light theme.

After you run the file, log out and log back in or restart your PC.


if you want to do this by hand, you’ll need to open the registry editor and create the following keys. In earlier builds of Windows 10, this value was named "SystemUsesLightTheme", but it’s named "AppsUseLightTheme" in the final version of Windows 10.
  • Under HKEY_LOCAL_MACHINE\SOFTWARE\Microsoft\Windows\CurrentVersion\Themes\Personalize, create a DWORD value named "AppsUseLightTheme" with the value of "0". 
  • Under HKEY_CURRENT_USER\SOFTWARE\Microsoft\Windows\CurrentVersion\Themes\Personalize, create a DWORD value named "AppsUseLightTheme" with a value of "0".
Log out and log back in, or restart your computer. Delete these values later (or set them to "1") to re-enable the light theme.

Dark Themes for Microsoft Edge and the Windows Store

Microsoft’s new Edge browser has an easy-to-enable dark theme. In Edge, open the menu and select Settings. Select the "Choose a theme" box, and pick "Dark." This will make Edge’s browser interface dark.

This option won’t change the colors of web pages, which will remain mostly white. Making most web pages appear dark would require a custom stylesheet, which won’t be an option until Microsoft Edge eventually gains support for browser extensions.


The Windows Store also has a dark theme, although it’s hidden. Open the Windows Store and press Ctrl+T to toggle the dark theme. Press Ctrl+T again to switch back to the light theme.

Microsoft may add this option to more applications in future app updates that roll out through the Windows Store. The above tricks both work even if you haven’t enabled the system-wide dark theme option.

Dark Theme for Traditional Desktop Applications

While many universal apps will now use a darker theme, desktop applications like the File Explorer window will continue to use their standard, light, white-heavy themes. You can enable a dark theme for desktop applications in the same way you could on previous versions of Windows — by enabling a custom visual style.

Windows does include several "High-contrast" desktop themes you can enable if you really want a dark theme. To find this option, right-click the desktop, select Personalize, select Themes in the Settings window that appears, and select "Theme settings". Select one of the high-contrast themes at the bottom of the window. However, these themes aren’t the best-looking, so you probably won’t want to use them.

To get a higher-quality dark theme on the Windows desktop (one that changes the interface of the File Explorer window to look dark, for example) you’ll need to do the same thing you had to do on previous versions of Windows. This involves patching your uxtheme.dll to allow user-created visual styles and downloading third-party Windows styles from the Internet.

Many applications do offer their own theme features, so you could also just theme individual applications you rely on. For example, you could install dark themes for the Chrome or Firefox browsers.


Windows 10’s dark themes certainly seem like a work in progress. As this is an option on Windows Phone (now known as Windows Mobile once again)  it may eventually be polished enough and become a proper option in Windows 10’s Settings app. But, even when it does, you’ll still have to hunt down third-party dark themes for the desktop. The option only applies to those new universal apps.

Saturday, August 1, 2015

How to Easily Fix Connection Problems With a Browser


Howtojetro.blogspot.com | How to Easily Fix Connection Problems With a Browser - When your browser cannot connect to the Internet, more than one problem may need to be addressed. Connection problems with your browser can have many causes and fixing them may require more than one solution. The steps you take depend on the type of browser.

Instructions

1. With Internet Explorer, delete Temporary Internet Files. Click the Tools drop down and select Internet Options. Click "Delete" under Browsing history. Put a check in the options for Temporary Internet Files and then click "Delete."

With Firefox, delete the Browsing History. Click the Tools drop down and select "Clear Recent History." Click the arrow on the Clear Recent History window and put a check in the option for "Cache." Click "Clear Now" to delete the cache.

2. Verify that your firewall is set to allow your browser to access the Internet. If you receive a notification that a changed program needs to access the Internet, you will need to allow access. Turn off your firewall to see if it is blocking your browser from commenting to the Internet.

3. Disable the antivirus program running on the computer and then open your browser. If the browser connects without any problems, your antivirus program is preventing the browser from connecting. This will require you to adjust the settings for your antivirus program.

4. Run a spyware scan on your computer using a program such as Spybot - Search and Destroy. Save the file to your system and then double click on the setup file to install the program on your system.

5. Rename the Hosts file on your system and try to connect with your browser, to see if it is causing problems with the connection. Right click on the Hosts file and select "Rename" from the context menu. Add a letter or number to the beginning of the file and click "OK."

6. Reset your modem if you are using a dynamic IP address. The easiest way to reset a modem is to turn it off and then back on.

Tips & Warnings
  • If your temporary Internet files folder and Internet cache is full, the browser may not connect to download data correctly.
  • Refer to the documentation for your firewall to properly turn it off or disable it.
  • If you have a dynamic IP address, a different one will be used when resetting the modem.
  • Failing to re-enable your antivirus or firewall after you have turned it off may result in a virus or spyware infection.

Thursday, July 30, 2015

How to Keep Pop-Up Ads From Coming Up


Howtojetro.blogspot.com | How to Keep Pop-Up Ads From Coming Up - You have different ways of dealing with pop-up ads depending on the Web browser you use. Google Chrome, Internet Explorer, Mozilla Firefox and Safari all have built-in pop-up blockers. You can choose to install third-party applications and browser extensions to help prevent pop-ups, like Adblock Plus and Better Pop Up Blocker. You may miss out on certain website features by using these programs.

Google Chrome

Chrome automatically blocks pop-ups by default. You'll notice an icon appear in your address bar whenever a pop-up has been blocked. You can choose to allow pop-ups on selected sites or block them altogether. You can add websites to an exceptions list that allows pop-ups from sites that you choose. To access the exceptions list, click on the three-line Google Chrome menu, then on "Settings" and then "Show Advanced Settings." Navigate to the Privacy section and click on "Content Settings." You'll see an option to manage exceptions within the pop-up section.

Firefox and Safari

Firefox blocks pop-ups in the same way as Chrome, displaying an icon in the address bar whenever a pop-up has been blocked. You can choose to allow pop-ups on certain sites by adding them to the exceptions list. In Safari, you can enable pop-up blocking by clicking "Safari" at the top left, selecting "Preferences" and then clicking on "Security." You'll see an option to block pop-up windows. If you're still seeing pop-ups even with the blockers enabled, there are browser extensions that can add protection.

Browser Extensions

Adblock Plus (link in Resources) is a browser extension available for Firefox, Chrome, Opera, Internet Explorer and Android devices. Adblock Plus blocks banners, pop-ups and video ads. It installs into any supported browser and can be configured to block ads in your Facebook and YouTube accounts. Better Pop Up Blocker (link in Resources) is a Chrome extension that offers improvements over Chrome's built-in pop-up blocker. Better Pop Up Blocker stops pop-unders and new tab pop-ups in addition to the pop-up blocking natively offered by Google Chrome.

You Could Miss Out

Pop-up blockers and browser extensions can block pop-ups that are necessary for the intended website experience. If you use a browser extension like Adblock Plus or Better Pop Up Blocker, you could be missing out on website features that you would otherwise see. Instead of blocking pop-up ads altogether, you can manage your pop-up settings by website. If there are certain websites you want to receive pop-ups from, make sure those websites have been added to your exceptions list. If you're having difficulty logging into a website that requires pop-ups, try disabling the pop-up blocker altogether.

Tuesday, July 21, 2015

How to Remove Windows PC Defender Virus


Howtojetro.blogspot.com | How to Remove Windows PC Defender Virus - Windows PC Defender is designed to look like anti-virus or anti-spyware software from Microsoft, but it is actually a virus. Windows PC Defender pretends to scan the computer for infections, displays a fake results log, then demands you to purchase the full program to fix the "detected" viruses. Although the program claims to be an anti-virus program, it actually blocks real anti-virus programs from removing Windows PC Defender. It also hijacks all program icons so that you can't launch your real anti-virus software or any other program. If your PC is infected with the Windows PC Defender virus and you can't run your anti-virus or anti-malware software, you can remove the infection manually.

Instructions

1. Turn on or restart the computer and press "F8" on the boot screen to open the Windows Advanced Boot Options menu. Scroll to "Safe Mode" and press Enter.

2. Sign in to Windows. Hold down "Ctrl-Shift-Esc" to open Windows Task Manager. Click the "Processes" tab.

3. Click "Image Name" to alphabetize the processes. Right-click "eb.exe." Select "End Process" from the menu. Click "End Process" again.

4. Repeat the above step for fix.exe, ppal.exe and WP345d.exe.

5. Click "File." Click "New Task" to open the "Run" window. Type "cmd" and press "Enter" to open a command-line window.

6. Type "cd c:\windows\system32" at the command-line prompt. Press "Enter." Type "regsvr32 -u mozcrt19.dll" and press "Enter" to unregister the Windows PC Defender dynamic linking library.

7. Repeat the process for sqlite3.dll, cid.dll and ddv.dll. Type "cd %userprofile%\recent" at the command prompt and press Enter. Unregister tempdoc.dll. Close the command-prompt window.

8. Reopen the "Run" box. Type in "regedit" or "regedit.exe." Press Enter to open Windows Registry Editor.

9. Navigate through the "HKEY_CLASSES_ROOT" and "CLSID" paths. Right-click "{3F2BBC05-40DF-11D2-9455-00104BC936FF}." Click "Delete." Click "Yes" to confirm.

10. Return to "HKEY_CLASSES_ROOT." Right-click "WP345d.DocHostUIHandler" and click "Delete." Click "Yes" to confirm the deletion.

11. Go through "HKEY_USERS | .DEFAULT | Software| Microsoft| Internet Explorer." Click "SearchScopes."

12. Right-click "URL," which has the value of "http://search-gala.com/?&uid=201&q={searchTerms," and click "Delete." Click "Yes" to confirm the deletion.

13. Return to "Internet Explorer." Right-click "PRS," which has the value of "http://127.0.0.1:27777/?inj=%ORIGINAL%." Click "Delete." Click "Yes."

14. Go to "HKEY_CURRENT_USER\Software\Microsoft\Windows\CurrentVersion\Internet Settings." Find and delete "UID" with the "201" value.

15. Click "HKEY_CURRENT_USER\Software\Microsoft\Windows\CurrentVersion\Internet Settings\5.0\User Agent\Post Platform." Delete "89770891803."

16. Open "HKEY_CURRENT_USER\Software\Microsoft\Windows\CurrentVersion\Run." Delete "Windows PC Defender."

17. Click the Start button at the bottom left of your monitor screen. Click "Computer." Enter "8424.mof" into the search bar and wait for the computer to locate the file. When the file appears in the results, right-click it, then click "Delete." Click "Yes."

18. Repeat the process for the following files associated with Windows PC Defender: exec.tmp, mozcrt19.dll, CLSV.tmp, fix.exe, search.xml, ddv.dll, eb.exe, sqlite3.dll, tempdoc.dll, WP345d.exe, runddlkey.drv, WPCD.ico, ppal.exe, wpcd.cfg, energy.sys, vd952342.bd, cookies.sqlite, Windows PC Defender.lnk, PE.drv, cid.dll, eb.sys, FS.drv, Instructions.ini, kernel32.drv and PE.tmp.

19. Go to "C:\Documents and Settings\All Users\Application Data." Delete the following folders: "3adffe," "WPCDSys" and "345d567."

20. Type "%userprofile%\application data" into the address bar and press Enter. Right-click "Windows PC Defender" then click "Delete." Click "Yes" to completely remove the Windows PC Defender virus from your computer. Restart your computer.

Tips & Warnings
  • Enable hidden files on your system if you can't find the files. Select "Tools" from within Windows Explorer. Click "Folder Options." Select the "View" tab and click "Show Hidden Files, Folders and Drives." Click "OK."
  • If you can't open Task Manager, download and run Pocket KillBox. Locate and select the process in the right pane, then click "EndTask."
  • Windows PC Defender is an extremely aggressive virus. After removing it, consider using System Restore to restore your system to an earlier state, before it was infected. If the recommended procedure doesn't work, or the virus returns, you may have to wipe and reformat your entire computer system.

Monday, July 20, 2015

How to Install Android Apps on Your Phone or Tablet


Howtojetro.blogspot.com | How to Install Android Apps on Your Phone or Tablet - Google provides a primary app store for Android, known as Google Play. However, Android isn't like iOS. Google Play isn't the only game in town, and there are other ways to install apps on Android.

Some Android devices (particularly dirt-cheap ones coming direct from manufacturers in China) aren't certified by Google and don't include Google Play. This makes the device much less useful, but you can still install apps on it.

Google Play App

The primary way you'll install apps on Android is by firing up the Play Store app on your phone or tablet. You'll find the Play Store in your app drawer and likely on your default home screen. You can also open it by tapping the shopping bag-like icon at the top-right corner of the app drawer. Once in the store, browse or search for an app and tap the Install button to install it.

Google Play on the Web

Hunting for apps using a touchscreen keyboard isn't the most convenient way to install apps. To install apps from your computer, visit the Google Play website at play.google.com. You can search and browse for apps on the website.

As long as you're logged in with the same Google account you use for your Android phone or tablet, you can click the install button on the website to remotely install the app on your phone or tablet. If you have multiple Android devices, you can select the one you want the app installed on. Once you've told Google Play to install the app, your phone or tablet will start downloading the app and install it for you.

Sideloading Apps

Android supports sideloading, which allows you to install apps from outside of Google Play. However, this is disabled by default for security reasons. To enable sideloading, open the Settings app on your Android, tap the Security category, and enable the Unknown sources check box.

Note that this can be a security risk, as it allows installation of apps from outside the Play Store, which could potentially contain malware. If you enable this setting, it's your job to install applications responsibly, stay away from pirated games and other apps that may contain Android malware.


After enabling this setting, you can download an Android app in .APK format and install it on your device. For example, you could download the .APK file in your Android's browser and open it from the Downloads app. You could also download the APK file to your computer, copy it over to your Android's file system with a USB cable, use a file manager app to browse to it, and tap the APK file to start installing it.

Sideloading allows you to install a variety of apps that aren't available in the Play Store, such as the XBMC Media Center for Android, various emulators that have been removed from Google Play, and third-party app store apps like the Amazon Appstore for Android and Humble Bundle app.


This option may not be available on some devices if the device's manufacturer or carrier has disabled it. AT&T once did this, but it's become much less common. Most devices should have the Unknown sources checkbox.

Third-Party App Stores

Android allows for third-party app stores. The most well-known and popular one is Amazon's Appstore for Android (currently only available in the US), which gives away a free paid app every day. Amazon's Appstore for Android is also used natively on Amazon's Kindle Fire devices.

The ever-popular Humble Bundle, which sells bundles of indie games for Windows, Mac, and Linux, has also sold bundles of Android games. If you purchased any of the Humble Bundles containing Android games, you could install the Humble Bundle app and use it to manage the installation and updating of your Humble Bundle games. To use either the Amazon Appstore, Humble Bundle, or other third-party app stores, you’ll need to sideload the app store’s app.

Some devices may come with their own, integrated third-party app stores. For example, Samsung devices come with the Samsung Apps app, which may contain free versions of some paid apps, but is otherwise fairly uninteresting. Carriers have distributed their own app stores with their Android devices in the past, but this is becoming less common.

Just as you should be extra careful when sideloading apps, you should be extra careful when using third-party app stores. For example, you can probably trust Amazon and the Humble Bundle, but you should beware of many other app stores. For example, an untrustworthy app store distributing pirated apps may be a source of malware. We recommend staying away from those.

Sideloading From Your PC

You can also sideload apps onto your Android device in other ways. For example, if you have an APK file on your computer, you can use the excellent AirDroid app to upload it to your Android device and install it without even connecting your Android device to your computer.

If you’re a developer, you can use the adb (Android debug bridge) command to "push" an app to a connected device, installing it from your computer. The appropriate command is as follows, where C:\package.apk is the path to the APK file on your computer:

adb install C:\package.apk

You can also install Android apps on your Windows PC, which opens up a whole new world of touchscreen games and apps on touch-enabled Windows 8 devices.

Sunday, July 19, 2015

How to Repair Corrupted Windows System Files with the SFC and DISM Commands


Howtojetro.blogspot.com | How to Repair Corrupted Windows System Files with the SFC and DISM Commands - The System File Checker tool built into Windows can scan your Windows system files for corruption or any other changes. If a file has been modified, it will automatically replace that file with the correct version.

If the SFC command doesn’t work, you can use the DISM command on WIndows 10 or Windows 8 to repair the underlying Windows system image. On Windows 7 and earlier, Microsoft offers a downloadable "System Update Readiness Tool" instead.

When You Should Run These Commands

Run this command when troubleshooting a buggy Windows system. If Windows is blue-screening, applications are crashing, or some Windows features just aren’t working properly, the SFC command may be able to fix this. Even if the SFC command doesn’t repair any files, running it will confirm that no system files are corrupted and you can continue to troubleshoot your system with other methods.

You shouldn’t normally have to run the DISM command. However, if the SFC command fails to run properly or can’t replace a corrupted file with the correct one, the DISM command or System Update Readiness Tool can fix the underlying Windows system and make SFC run correctly.

Run the SFC Command to Repair System Files

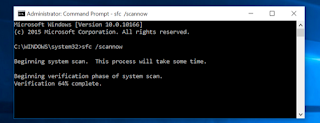
You’ll need to do this from and Administrator Command Prompt window. To open one on Windows 10 or 8.1, right-click the Start button and select "Command Prompt (Admin)". On all versions of Windows, you can also search the Start menu for Command Prompt, right-click it, and select Run as Administrator.

Type the following command into the Command Prompt window and press Enter to run a full system scan:
sfc /scannow
Leave the Command Prompt window open until the command completes, this may take some time. If everything is fine, you’ll see the message "Windows Resource Protection did not find any integrity violations."

If you see a "Windows Resource Protection found corrupt files but was unable to fix some of them" message, try rebooting into Safe Mode first. On WIndows 10, 8.1, or 8, hold the Shift key while clicking the Restart option to access the advanced boot options menu. On Windows 7 or earlier, reboot your computer, and then press and hold the F8 key while it’s booting up. Run the sfc /scannow command from within Safe Mode.

Run the DISM Command to Fix SFC Problems

On WIndows 10, 8.1, and 8, the Deployment Image & Servicing Management tool can fix component store corruption that prevents the SFC command from working properly.

To run this command, open a Command Prompt as administrator. Type the following command and press Enter. DISM will check your Windows component store for corruption and automatically fix any problems it finds.

DISM /Online /Cleanup-Image /RestoreHealth

Allow the command to finish running before closing the Command Prompt window. This may take five to ten minutes. It’s normal for the progress bar to stay at 20 percent for a while, so don’t worry about that.

If the DISM command changed anything, restart your computer afterwards. You can now run the SFC command again and it would be able to replace any corrupted files with the correct ones.


On Windows 7 and earlier, the DISM command isn’t available. Instead, you can download and run the "System Update Readiness Tool" from Microsoft and use it to scan your system for problems and attempt to fix them.

Try System Restore or a System Reset

If you’re still experiencing system problems and these tools can’t help, you can try more drastic actions. Running the System Restore tool will restore your Windows operating system files to an earlier state, and this may fix system corruption problems if the operating system wasn’t damaged at that earlier point.

There’s always just performing a system reset or reinstalling Windows, too. On Windows 10, 8.1, and 8, you can perform a "Reset this PC" operation to reset Windows to its default state. You’ll have to reinstall your programs after, but you won’t lose any personal files. On Windows 7 and earlier, this will require using your computer's manufacturer-provided recovery partition or reinstalling Windows from scratch.

If you encounter other errors while running the above commands, try searching the web for the errors you encounter. The commands will often point you to log files with more information if they fail, too - check the log files for more details about specific problems. Ultimately, it may not be worth troubleshooting serious Windows corruption problems when you can just reset Windows to its default state or reinstall it.

The above commands also have other options, too. For example, you can have the SFC command check only a single Windows file for corruption and repair it. You can have the DISM command perform a quick check for system corruption without repairing it, or provide a WIM or ESD file containing Windows operating system files.

Friday, July 17, 2015

How to Protect Yourself from RFID : Frightening Tracking Tech


Howtojetro.blogspot.com | How to Protect Yourself from RFID : Frightening Tracking Tech - A creepy new spying technology called Radio Frequency Identification, known by its abbreviation RFID, is starting to show up on products you buy at stores like Walmart, and it could be used to track your every move.

What is RFID?

RFID is a tracking technology. It uses tiny microchips hooked up to miniature antennas to track items from a distance. This chip and antenna combination is called an RFID tag. You can see a typical RFID tag here in the diagram. Each tag contains an ID number that uniquely identifies the item to which it is attached. It’s like a Social Security number for things.

RFID tags are tracked by RFID reading devices. These RFID readers gather information from the RFID tags via radio waves, similar to the radio waves that allow you to listen to your favorite FM radio station. RFID radio waves, like FM radio waves, travel invisibly through solid objects like purses, backpacks, wallets and shopping bags.

How do RFID systems keep track of items?

RFID readers collect and process information from matching RFID tags whenever they’re in reading range. Since each RFID tag contains a unique ID number and is associated with a specific item, it’s possible to link items to specific customers at checkout. This makes it possible to track them going forward. There are some preliminary plans to watch the tags all the time, long after purchase, anywhere in the world, through a coming infrastructure known as the "Internet of Things."

RFID tags are easy to hide. They can be sandwiched in price labels, hidden within the soles of shoes, printed on boxes, and even woven right into fabric and clothing labels. Right now you might have an RFID tag in a store loyalty card or in a credit card and not know it!


Most RFID tags get their power from the reader device, so they don’t need batteries. With no parts to wear out, they can beam tracking information to RFID readers indefinitely. And RFID readers themselves can be hidden. We’ve seen plans to embed them in floors, doorways, ceiling tiles and store shelves. Retail logistics departments justify investing in RFID because it lets them locate store inventory at all times and ensure the shelves stay stocked. Marketing departments, on the other hand, love the thought of using RFID to gather intimate data on customers by tracking their movements and secretly scanning the contents of their pockets, purses or backpacks.

This all-seeing X-ray type vision is why we nicknamed RFID microchips "spychips."
We got the lowdown on RFID by attending industry conferences and uncovering a cache of top secret documents that detailed how global corporations and government agencies hope to use RFID-tagged items to track consumers not only in retail stores, but in public spaces and even private homes.

If this all sounds preposterous, we assure you it’s not. IBM has patented something it calls a "person tracking unit" that can track people wearing and carrying RFID tagged items in public places like museums, shopping malls, theaters and libraries, even elevators and public restrooms.

Unfortunately, IBM isn’t alone. AT&T, Procter & Gamble, NCR and other big companies have all developed equally horrifying ways to abuse the technology. And abuses have already occurred. Check out these links to see how Gillette and Procter & Gamble hid RFID tags in innocuous-looking products, then triggered hidden cameras to watch people.

RFID offers companies tremendous power to learn about their customers’ behavior, deliver targeted advertising and even decide which customers deserve top shelf service and which ones to treat badly to discourage them from shopping in their stores. The power all flows one way, though. In their voracious worldview, marketers are the watchers and the manipulators, we customers are the watched and manipulated.
RFID is clearly not in my best interest. How do I protect myself?
It’s not easy to avoid RFID, since tags can be hidden so easily in the things you buy. The good news is that we’ve been sounding the alarm in the early stages while there is still time to stop businesses from putting their horrible ideas into practice. Here’s what you can do:

1. Educate yourself about RFID. Our bestselling book Spychips : How major Corporations and Government Plan to Track Your Every Move with RFID details where RFID is being planned. The book is in many libraries and can be found new and used in bookstores and online.  You can read the hilarious introduction by famed sci-fi writer Bruce Sterling,  and you can read the first chapter free.

2. Sign up to receive information about RFID and other invasive tracking plans via our website at www.spychips.com. (Note: Please excuse our dust. We are in the process of revamping our website, but the CASPIAN newsletter sign-up form works.)

3. Ask stores if they are using RFID and, if so, where and how. If they’re using it on consumer products, we recommend avoiding the store, or at the very least demanding that RFID tags on the things you buy are removed or permanently disabled at the checkstand. Note: In our opinion, removing and disabling RFID is the moral responsibility of the store. It’s not a burden they should pass on to you, the customer.

4. Finally, help us spread the word about the downsides of RFID. Share links to this article with friends, coworkers, and loved ones. If we work together and let stores know we won’t tolerate being tracked, they’ll have to honor our collective power or die a slow, costly death. We consumers have more control than we realize, since stores depend on our shopping dollars. Give your financial support to retailers that put customers first!

Thursday, July 16, 2015

How to Never Lose Files Stored in Dropbox and Other File-Syncing Services


Howtojetro.blogspot.com | How to Never Lose Files Stored in Dropbox and Other File-Syncing Services Dropbox, iCloud Drive, Google Drive, OneDrive, and other file-syncing services are convenient, but they also sync deletions and changes. You can often recover deleted files or undo changes, but they shouldn’t be your only backup method.

Most cloud storage services offer a way to undelete files via the web and many allow you to undo changes to your files and get older versions back. But they only keep these old files for so long.

Deletions and Changes Sync Instantly
When you use a service like Dropbox to store your important files, one "master copy" of your files is stored on the service’s servers. Every time you delete or modify files, the program syncs your changes with the server, and those changes sync on your other computers.

So far, so good. But this means that, if you accidentally delete a file, it’s instantly deleted from your other computers. If you modify a file, it’s changed on all your other computers. If your computer gets infected with malware and that malware tampers with your files, the tampered-with versions will sync to your other computers. If the syncing program has a bug and accidentally deletes some files, they’ll be deleted on your other computers, too.

The copy of your files on the remote servers do qualify as an offsite backup, and they’ll help protect your files if all your hardware is damaged or stolen. But changes happen instantly, and old files are only kept for so long.

There are ways to get those deleted files back and revert to old copies of your files, but they’re limited.


How Long You Can Get Deleted Files Back
When you delete files from a cloud storage service, they’re sent to the Recycle Bin (on Windows) or Trash (on a Mac). That’s the good news! If your file-syncing client decides to delete some files, they’ll be on your computer, ready to be recovered.

But you might end up emptying your Recycle Bin or Trash without noticing. In this case, you’ll have to recover them from the cloud storage service’s website.

Dropbox only keeps deleted files for 30 days, so you’ll have to notice the file was deleted and recover it before then. Pro subscribers with "Extended Version History" can recover files for up to a year.

Other services are more generous. Google Drive seems to never automatically remove deleted files from the trash. OneDrive deletes files after a year but will automatically start deleting the oldest files after three days if the Recycle Bin fills up.

Apple’s iCloud Drive doesn’t offer any way to get a deleted file back, not even a trash or recycle bin. It just depends on you having local Time Machine backups.


How Long You Can Revert Modified Files
Cloud storage services also keep previous versions of files. If you or a program on your computer modifies these files, you can get them back by reverting to an older version of the file. You can do this from the service’s website, too - right-click a file and select the appropriate option to see a list of older versions of the files you can use.

As with a trash or recycle bin, the problem is that services won’t keep these old versions around forever. They take up space, after all.

Dropbox only keeps snapshots of previous versions of your files for 30 days. You’ll need the paid “Extended Version History” feature to get previous versions that last longer. Google Drive also keeps older versions of your files for 30 days.

Microsoft’s OneDrive only offers this for Office documents, and Apple’s iCloud Drive doesn’t offer it at all. Both depend on you having local backups.


Perform Regular Local Backups to Keep Your Files Safe
The real solution here, one that will ensure you’ll always have a backup copy of any important files you might accidentally delete or modify, even if your cloud storage service of choice doesn’t, is to create local backups, too.

You don’t need anything fancy or complicated. Just connect an external hard drive once a week or so and run your operating system’s backup tool. On Windows 7, that’s Windows Backup. On Windows 8, 8.1, or 10, that’s File History, if you’re using File History, be sure it’s backing up your cloud storage folder, too. On a Mac, it’s Time Machine. As long as you’re syncing the contents of your cloud storage to your PC, the backup tool will make a copy of those files and store them on the backup drive.

You may never have to touch these backups if our cloud storage service never has any problems, but you’ll be thankful for the additional backup if you ever need it. If you store important files in cloud storage, be sure you have a local backup, just in case.

Tuesday, July 14, 2015

How to Get Rid of Trojan Viruses for Free


Howtojetro.blogspot.com | How to Get Rid of Trojan Viruses for Free - Do you have trojan viruses on your computer? Do you need to get rid of them, but you don't have enough money to buy a fancy anti-virus program? Have no fear, there are easy ways to remove a computer virus, even a trojan virus, for free. Trojans, should you happen to get one on your computer, can be nasty little buggers. Trojans are programs that get installed on your computer. They are made to appear to do one specific task, but are in reality doing something completely different. Usually, they will take the form of an adware or spyware scanner, and they will appear to scan. In reality, they are placing harmful software on your computer. Getting rid of viruses isn't always simple, but here are the steps necessary to take to get rid of the trojans on your computer for free.

Things You'll Need
  • AVG Anti-Virus Software
  • Paper
  • Pencil
Instructions
1. Scan your hard drive using AVG. AVG is a free online virus removal program that actually works better than some anti-virus programs that you would pay for. AVG can usually pick up and destroy trojans with minimal fuss. When AVG finishes scanning, it will bring up a list of malicious software on your hard drive. AVG will try to remove these on its own, but sometimes it cannot, and will give you the option to place it in a "virus vault". The virus vault is a place the AVG uses to isolate the viruses that are on your hard drive, and keeps them from harming your PC farther. If this does not remove all of the malicious trojans on your hard drive, move on to step 2.

2. Visit TrendMicro Housecall and use its free online virus scanner to try to detect and remove the trojans. Housecall does a very good job at picking up and removing viruses that AVG might have overlooked. What's even better than that is the fact that it's based in a web browser, so it cannot be altered or corrupted by any harmful software. After Housecall has finished, it will show you a list of harmful software on your computer. Then you will have to manually select it and try to remove it. If this fails to remove the harmful trojan from your computer, move on to step 3.

3. Write down the harmful files that weren't removed from the scans. The scans will give you details on the files that the software is attached to, so writing down the name of the file and the location of the file is important.

4. Attempt to manually delete these files. Sometimes, a trojan virus will not let you delete it in any way. If all of the above so far has failed, then it may be time to get a bit more drastic.

5. Formatting your hard drive is always a good way to ensure that you remove viruses, including the trojans, on your hard drive for good. It's a bit drastic, but leaving these malicious programs on your hard drive can only do harm to you. You leave more personal information on your hard drive than you realize, and many of the programs that the trojan will download to your computer are designed to try to steal your personal information, so that people can use it to ruin your credit.

Tips & Warnings
  • If you have a geeky friend or neighbor kid that can help you do this, all the better. Trojans are tough to get rid of, and it helps to have somebody with a lot of computer experience fighting on your side.

How to Create a Calculator With Javascript


Howtojetro.blogspot.com | How to Create a Calculator With Javascript - JavaScript is a scripting language used for developing web applications. Using JavaScript, you can create a simple calculator to put on your website or on your desktop by opening the local file in your JavaScript-enabled web browser. Creating a JavaScript calculator is a good exercise for beginners to practice JavaScript and improve coding skills.

Things You'll Need
  • Text editor
  • Javascript-enabled web browser
Instructions
1. Open your text editor, which must be set to "plain text" mode. Examples of appropriate text editors include Notepad for Microsoft Windows and TextEdit for Mac OS X.

2. Create your HTML document. Include a table that has three sections: one for numerical input buttons; another for operation buttons; and a section for displaying input and output. Create input buttons for each number (0 through 9), a decimal point and buttons for each operation (addition, subtraction, multiplication, division, exponents, etc) that you want to be able to perform with your calculator.

3. Define all global variables and constants. These variables should include a maximum length constant, a memory variable for storing the previously entered value, a current variable for storing the entered value and a variable for storing the operation.

4. Define functions for each operation (i.e. addition, subtraction, etc), clearing the input, putting a decimal point in the input and a function for performing the desired calculation.

5. Include a function that is called in the division function to ensure that the user does not attempt to divide by zero. If this is attempted, include a warning message of some type.

Tips & Warnings
  • Three source code examples for calculators written in JavaScript are listed in the References section. Anaesthetist provides thorough explanations with code examples for a simple calculator similar to the design discussed in this article. JS Made Easy and The JavaScript Source provide source code for more advanced calculators that are able to calculate trigonometric functions and logarithms.
  • This project should take less than an hour for an advanced JavaScript programmer. If you are a beginner, expect to spend two to four hours completing this project; this time frame estimate includes time spent reviewing code examples and other materials.

Monday, July 13, 2015

How Do You Know When It’s Time to Replace Your Battery?

Howtojetro.blogspot.com | How Do You Know When It’s Time to Replace Your Battery? Batteries don’t last forever, they only have so many charge cycles. As you use your battery, it will degrade over time and you’ll get less and less battery life from it. Eventually, you’ll want to replace a device’s battery, or get a new device with a new battery.


Even if you can’t access the battery yourself, you can often pay to have it replaced. For example, Apple stores will replace an iPhone or iPad’s battery for a fee.

All Batteries’ Capacities Decrease Over Time
A battery doesn’t just go from "good" to "bad" Instead, as you use it, it will slowly degrade. The battery’s capacity will decrease and it’ll be able to store less and less power. This is a gradual process, and you won’t necessarily notice until you realize you used to get a few more hours of battery power from your device.

You can help prolong your battery’s life and keep its capacity up by properly caring for your battery, but all batteries will eventually fall victim to entropy. There’s just no getting around this. If you’re lucky, you’ll never have to replace your battery, it will just keep working well enough until you upgrade to a new phone, tablet, laptop, or other device with a new battery. If not, you’ll have to replace it.

If a battery is nearly dead, some devices will warn you that it’s time to replace it.


How to View a Device’s Battery Health
You can check your battery’s health level before you see a critical warning. Some devices may not display such a warning at all, so you may need to check the battery health information to see whether the status is critically low or not. Here’s how to find battery health information on some common operating system:

1. Windows Laptops: We recommend NirSoft’s BatteryInfoView to find a Windows laptop’s battery health, but there are other utilities you can use instead.

2. MacBooks: Hold down the Option key and click the battery icon on the menu bar. You’ll see a “Condition:” line displayed here.

3. iPhones and iPads: You’ll need some sort of third-party application that will display your device’s battery health. For example, CoconutBattery is an app you can install on your Mac. It’ll let you view the battery status of connected iPhones and iPads. This information isn’t normally displayed in iOS.

4. Android Phones: Open the dialer app and dial *#*#4636#*#*. Tap “Battery information” to see that status of your Android device’s battery.
For other devices, search for the type of device and “battery health” to get instructions.

When It’s Time to Replace a Battery
Whatever your device says about the health of its battery, it doesn’t necessarily matter. For example, if your battery reports it’s at 40 percent of its original capacity and you’re still happy with how much battery life you get, you don’t necessarily need to replace it. But its battery life will continue to decrease.

On the other hand, if you’ve seen a device’s battery life decline sharply and you want longer battery life from it, it’s probably time to replace its battery. Be sure to follow tips for extending a device’s battery life before deciding the battery’s hardware is at fault. It could just be background applications draining your device’s battery more quickly.


How to Replace a Battery
If you have a smartphone, tablet, laptop, or another device with a removable battery, this is easy. You’ll just need to purchase a replacement battery designed specifically for your device, power down your device, and then replace the current battery with the new one. This will give your device a fresh battery with maximum capacity, increasing its battery life.

More and more smartphones, tablets, laptops, and other devices are made without batteries you can access yourself. In some cases, these are designed so the manufacturer can replace the battery for you. For example, you can take an old iPhone, iPad, or MacBook to an Apple Store and pay a fee to have Apple employees open your device and replace the battery for you. Check if your manufacturer offers this service.

There’s always the option of doing it yourself, of course. You could potentially open up your device, get a replacement battery, and try to seal it back up again. We don’t necessarily recommend this - so many modern devices have batteries and other components that are glued together and not designed to be opened. This may be a more reasonable option for some devices - it depends on the device and how it’s built.

The battery health status your device reports can help you decide whether it’s time to replace your battery, but the decision is ultimately up to you and based on how much battery life you need. For example, if you have a laptop that originally offered eight hour battery life but is now down to four hours, you may not necessarily want to replace the battery. If that four hours is good enough for you, you may want to save your money and put it toward buying a new laptop in the future. That’s your decision.

How to Print Photos From an Android Smartphone or Tablet


Howtojetro.blogspot.com | How to Print Photos From an Android Smartphone or Tablet - Photos you take on your Android smartphone don’t have to stay digital. You can get physical copies of those photos printed out quickly and easily - using your own printer, at a local store, or sent to you in the mail. You don’t need any fancy hardware to do this. You could use your own photo printer, but that isn’t even an ideal solution - if you just want to print the occasional photo, just pay per-print.

Print Photos on a Home Printer
You can print photos yourself, if you have the appropriate type of printer. But this probably isn’t the ideal solution unless you want to print a lot of photos on a regular basis. For hardware, you’ll want a dedicated photo printer with high-quality photo paper. You’ll also need to buy color printer ink, of course. Don’t just print to a piece of typical printer paper using any old printer you have lying around.

Software-wise, you’ll need a way for your Android phone to communicate with the printer. Google Cloud Print offers this, in theory. But, unlike Apple’s AirPrint, we’ve had hit-and-miss results with a number of Google Cloud Print-enabled printers. Quality of the resulting printout can suffer, which is a problem when printing photos instead of just plain-old text documents. We’d recommend not buying a Google Cloud Print-enabled printer if you actually just want to print photos. Using Google’s Cloud Print connector to activate Google Cloud Print capabilities on a wired photo printer also may not be ideal.

Instead, you’ll probably want to communicate with the printer a different way. Some photo printers can function over Bluetooth - just pair the phone and printer and send a photo over Bluetooth. Some Wi-Fi-enabled printers can even accept photos and other documents via email, so you could email a photo to your printer from your phone to print it.

Many printer manufacturers offer their own dedicated Android apps that you can install on your phone and use to print photos to a Wi-Fi-enabled printer. For example, these apps include HP ePrint, Epson iPrint, and Brother iPrint&Scan. If you’re buying wireless photo printer just for this, be sure you’re getting one that can work with an Android phone and not necessarily just with Google Cloud Print.

You can easily print a photo by opening it and using the Share button - share it to email, Bluetooth, or a manufacturer’s printer app you have installed on your phone.


Print Photos and Pick Them Up Today
If you just want the print out the occasional few photos, you might want to forget using your own printer. You won’t need to buy and maintain a printer, keep printer ink stocked up and fresh, or buy premium photo paper. So, while you are paying for each print, this will be cheaper for printing the occasional important photo.

Many of the same services that offer iPhone photo-printing apps also offer Android photo-printing apps.

Basically, there are a bunch of local businesses near you - think Walgreens, Target, CVS, and Walmart - that will print photos for you at their store and let you pick them up that same day. Apps allow you to find these local stores and send them photos from your phone so you can go in and pick them up in person. They’ll be professionally printed at high-quality and you won’t have to worry about purchasing a printer and dealing with all the maintenance.

The Kicksend app is convenient because it provides a directory of a variety of different stores you can have your photos printed at and pick them up. Other apps are also available - the Walgreens app allows you to order photo prints at Walgreens and the KODAK Kiosk Connect app allows you to order photos at CVS pharmacy locations and anywhere else with a KODAK Kiosk, for example.


Print Photos and Have Them Delivered
You don’t actually have to leave your house and head to a store if you don’t want to. If you’re not in a hurry and you don’t mind waiting a few days, you can have a service print them for you and mail them straight to your door.

In fact, the Kicksend app tries to encourage you to do this rather than rely on nearby stores when you open it. Other services are also available - Free Prints promises free photo prints for you, but actually charges for shipping so you won’t really get them for free. No service will really send you free printed photos without getting some money out of it, even if they say you’re just paying for shipping. SnapFish and PostalPix will also send you printed photos, and you can find many more similar services with a quick search of Google Play.

You could use these methods to send printed photos straight to friends or relatives, too - for a small fee, a service will print them for you and mail them straight to someone else.


Of course, you don’t just have to print from your Android phone. You could transfer those photos to your computer using a USB cable or access them on the web with a service like Google Photos, Dropbox, or Microsoft OneDrive and print them from your computer, too. This is ideal if you have a high-quality photo printer but it doesn’t work as well with your Android phone.

How to Improve the Wi-Fi Network Signal Strength in Your House or Workplace


Howtojetro.blogspot.com | How to Improve the Wi-Fi Network Signal Strength in Your House or Workplace - Wi-Fi is just radio waves, and many things can cause interference. But a strong Wi-Fi signal can give you faster performance and better coverage distance, so it’s important to properly position and configure your router for optimal signal strength.

Point the Antenna Up
Routers generally have physical antennas that are adjustable. The antenna often comes pointed horizontally to fit the router inside its box. For maximum signal strength, position your router’s antenna vertically, pointing straight up. If you have two antennas, you won’t get better performance by pointing them in different directions.


Position Your Router Properly
Consider where you put your router. If you have a large home or office, place the router close to the center to maximize coverage. If you position the router at one end of the building, you may have poor (or no) signal at the other end. But, if you already have your router positioned at one end of your home and the signal strength is just fine on the other side, you don’t need to move it.

For maximum coverage, the router should also be high up. Placing it on the floor is the worst location possible - place it on a high shelf, if possible.

Avoid Interference
Don’t place the router on or near large metal objects, such as metal shelves or filing cabinets. These can block the signal. Metal or stone walls can also block Wi-Fi, while wood and plaster walls won’t cause any problems.

You might be able to root out other sources of interference. For example: microwave ovens, 2.4 GHz cordless phones, and 2.4 GHz baby monitors all have the potential to interfere with a 2.4 GHz Wi-Fi signal. If you have one of these devices in direct line-of-sight between a laptop and a router, they could cause your Wi-Fi to cut in and out. The solution? Move any one of them so the interfering device isn't in between them. If you get interference from a cordless phone, you might want to purchase newer 5.8 GHz cordless phones; these work on a difference frequency band and won't interfere with Wi-Fi.


Choose the Best Wi-Fi Channel
If you’re in an area with many different Wi-Fi networks - such as an apartment complex or even just a house close to other homes - your neighbors’ Wi-Fi networks are probably interfering with yours.

To minimize this, move your router further away from the other Wi-Fi access points, if you can. For example, if you’re in an apartment and have a router in the corner of your room, your neighbor’s router might be right on the other side of the wall.

But the best thing you can do is switch to a different Wi-Fi channel. You access this option on your router’s settings page - check your router’s instruction manual for instructions on how to do that. (If you don’t have the instruction manual, you can almost certainly find the instructions online.) Locate the Wi-Fi channel option in the router’s web interface and change it to a different channel with less interference.

It might take a little experimentation to find the best one, but you can get help choosing a Wi-Fi channel using the Wi-Fi Analyzer app for Android phones and tablets, which will monitor the Wi-Fi networks near you and recommend the least-cluttered Wi-Fi channel for your network. Unfortunately, similar apps aren’t available for iPhone or iPad due to the limitations Apple places on app developers.

That’s it - all you really have to do is position your router well and choose the ideal Wi-Fi channel to optimize your network. Of course, buying a new router that supports modern, improved Wi-Fi standards may also offer you a signal strength and speed boost.

Sunday, July 12, 2015

How to Center an Image Using HTML Programming

Howtojetro.blogspot.com | How to Center an Image Using HTML Programming - A Web page coder uses Hypertext Markup Language to tell the Web browser the functional purpose of each element on a page, such as a paragraph, heading or list. Since HTML 4, Cascading Style Sheets have provided the coder with a way to tell the browser how each of those elements should look, separate from defining what they are. A page can have different CSS styles for different types of devices, such as mobile phones and desktop computers, allowing the page appearance to change without the coder needing to change the HTML. Use CSS properties to center an image.


Instructions
1. Place the "img" tag in the HTML file where you want your image to display on the Web page. It must be between the "body" tags and after the "h1" tags. For example,

<body>

<h1 style="text-align:center;">This is your text.</h1>
<img src="photo.jpg" alt="A description of the picture" width="270"
height="50" />

</body>

defines an image named photo.jpg that is 170 pixels wide and 50 pixels tall. It is the first thing on the page after the top heading.

2. Use the "margin" CSS attribute to define the space around page elements, such as pictures. The "auto" value for the margin attribute tells the Web browser to automatically determine the amount of space. So, <img src="photo.jpg" alt="A description of the picture" width="170" height="50" style="margin:auto;" /> defines that the space around the image is determined by the browser.

3. Use the "display" property to define how a page element is displayed. The "block" value for the display property tells the Web browser to display the element on its own line, with space above and below it. So, <img src="photo.jpg" alt="A description of the picture" width="170" height="50" style="margin:auto;display:block;" /> defines the same image, but the addition of "display:block;" now places it on its own line.

4. View the Web page in several different browsers to verify that the image is centered properly.

Hope this tips useful to you guys....

How to Make Your Nintendo 3DS’s Battery Last Longer

Howtojetro.blogspot.com | How to Make Your Nintendo 3DS’s Battery Last Longer - Nintendo’s New 3DS XL promises 3.5 to 7 hours of battery life, which is quite a large range. These tips will help you get as much battery life as possible out of your 3DS, whether you’re gaming or it’s just sitting in your pocket. This advice applies to all models of Nintendo 3DS - New 3DS XL, New 3DS, 3DS XL, 3DS, and even the 2DS. The New 3DS models have better battery life than the original 3DS models.


Disable 3D
The 3D feature uses quite a bit of battery power - when it’s enabled, the 3DS has to create and display two separate images on the top screen. On the New 3DS, the "super-stable 3D" feature uses your device’s camera to track your eyes and adjust the 3D image. This means that your 3DS has to provide power to the camera while 3D is enabled, too.

You should see another hour or more of battery life if you disable it. To disable it, just slide the 3D depth slider at the right side of the top display all the way to the bottom. When you want to prolong your battery life as much as possible, this is the feature to disable.


Lower Your Screen Brightness
As with any portable device, the 3DS will use more power when its screen brightness is higher. You can lower your screen brightness to save power and extend your battery life. To do this, visit the home screen, tap the settings icon at the top-left corner, and choose a lower brightness level under "Screen Brightness."

The New 3DS models offer "Auto-Brightness," which is enabled by default - they’ll automatically lower screen brightness levels when necessary by monitoring how bright it is in your environment. Older models will require you lower screen brightness manually.


Activate Power-Saving Mode
You’ll also find a "Power-Saving Mode" option in the settings menu accessible from the home screen. When this option is enabled, Nintendo says you’ll get 10-20 percent more battery life from your 3DS:

"Employing a technology called ‘active backlight,’ this feature ‘precisely controls the brightness of the backlight according to the brightness of the screen being displayed," Umezu explained. "When the screen as a whole is dark, the backlight itself gets darker, which saves power."

You should notice the difference after you enable this feature. The contrast will be lower and colors will be adjusted - whites become a bit more yellowish. Essentially, you’re getting worse picture quality and longer battery life when this feature is enabled.


Disable Sound
If you’re really hard up, disabling sound by sliding the volume slider all the way down will also allow you to squeeze a little more battery life out of your console.

Get a USB Cable and External Battery for Easier Recharging
Nintendo uses a proprietary charger for the 3DS. However, you can actually charge your 3DS over USB - Nintendo just doesn’t recommend it and doesn’t provide a cable for doing so. To do this, you’ll just need to buy a third-party USB charging cable for the Nintendo 3DS, like this one.

This cable will charge your 3DS slower than the dedicated charger brick, but it gives you flexibility. You can charge it anywhere USB power plugs are available, whether that’s in an airport, on an airplane, or even from any laptop. If you purchase an external battery pack that offers a USB port, you can even charge your 3DS from that portable battery like you’d charge your smartphone or any other USB-charging device. It’ll let you top up your battery if you’ll be away from power outlets for a while.